基于python,COCO数据集特定分类图片标注查看器实现
发布于 作者:苏南大叔 来源:程序如此灵动~
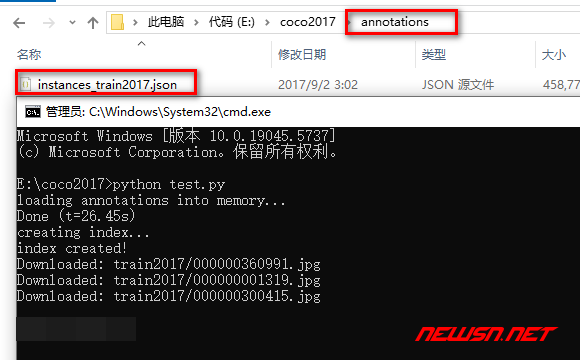
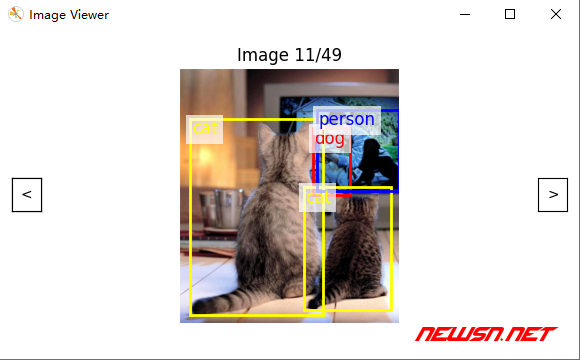
为了更深刻地理解coco数据集,苏南大叔根据instances_train2017.json这个文件,写了一个查看数据集图片及标注的查看器。这个文件来自于annotations_trainval2017.zip压缩包,它里面记载了官方图片地址coco_url。因此,并不需要下载train2017.zip这个高达18G的巨大图片压缩包了。

苏南大叔的“程序如此灵动”博客,记录苏南大叔的代码编程经验总结。测试环境:win10,python@3.12.9,pycocotools@2.0.8。coco数据集是由微软研究院发布的。这个查看器支持图片浏览、标注显示等功能。
前文回顾
对于coco数据集的简要介绍:
从上面的内容上可以得知,本文的两个相关压缩包的下载地址是:
- 训练集图片 (118K images)【约18G】 http://images.cocodataset.org/zips/train2017.zip
- 训练/验证标注文件 http://images.cocodataset.org/annotations/annotations_trainval2017.zip
在annotations_trainval2017.zip中,拿到instances_train2017.json待用。

依赖库
import matplotlib
from matplotlib.widgets import Button
from pycocotools.coco import COCO
import matplotlib.pyplot as plt
import cv2
import numpy as np
import os
import requests
from PIL import Image
from io import BytesIO
import threading
from queue import Queue
import sys
配置和工具函数
常量定义
CATEGORIES = ["dog", "cat", "person"]  # 同时具有这三个分类的图片
COLORS = {
    'dog': 'red',
    'cat': 'yellow',
    'person': 'blue'
}                                      # 标注及方框颜色
这里定义了需要显示的目标类别和对应的颜色标记。
下载工具函数

因为这里并没有下载大压缩包,而是临时下载从网络下载。所以,这里有个下载的函数。并且,下载之后就保存到本地了,不用二次下载。这客观上也有个图片筛选的作用。
def download_image(url, save_path):
    """下载图片并保存到本地"""
    try:
        response = requests.get(url, timeout=10)
        response.raise_for_status()
        img_data = BytesIO(response.content)
        img = Image.open(img_data)
        img.save(save_path)
        return True
    except Exception as e:
        print(f"Download failed: {url}\nError: {str(e)}")
        return False
不使用独立线程的话,界面就会被卡死。所以,必须独立线程。
def _download_worker(self):
    """下载线程工作函数"""
    while True:
        task = self.download_queue.get()
        if task is None:
            break
        url, save_path = task
        success = download_image(url, save_path)
        print(f"{'Downloaded' if success else 'Download failed'}: {save_path}")
        self._after_download(success)
        self.download_queue.task_done()
图形界面类(ImageViewer)

def __init__(self, coco, img_ids):
    # 初始化基本属性
    self.coco = coco
    self.img_ids = img_ids
    self.current_idx = 0
    self.is_downloading = False

    # 创建界面元素
    self.fig, self.ax = plt.subplots()
    self.fig.subplots_adjust(left=0.1, right=0.9)

    # 初始化组件
    self._create_buttons()
    self.download_queue = Queue()
    self.download_thread = threading.Thread(target=self._download_worker, daemon=True)
    self.download_thread.start()

    # 创建占位图和设置窗口
    self.loading_img = np.ones((300, 200, 3), dtype=np.float32) * 0.9
    self._setup_window()
    self.show_current_image()
标注绘制
def _draw_annotations(self):
    """绘制标注信息"""
    img_id = self.img_ids[self.current_idx]
    ann_ids = self.coco.getAnnIds(imgIds=img_id, catIds=self.coco.getCatIds(catNms=CATEGORIES))
    for ann in self.coco.loadAnns(ann_ids):
        # 绘制边界框和标签
        x, y, w, h = [int(b) for b in ann['bbox']]
        cat = self.coco.loadCats(ann['category_id'])[0]
        color = COLORS[cat['name']]

        self.ax.add_patch(plt.Rectangle((x, y), w, h, fill=False, edgecolor=color, linewidth=2))
        self.ax.text(x+3, y+3, cat['name'], color=color, fontsize=12,
                    bbox=dict(facecolor='white', alpha=0.7, edgecolor='none'))
完整代码
完整代码如下:
结语
以上就是这个COCO数据集图片查看器的主要实现细节。它展示了如何使用Python构建一个实用的数据集可视化工具,同时处理了异步下载、UI交互等实际应用中的常见问题。
苏南大叔调试了两天这个代码,可以使用键盘翻页,还可以使用左右按钮翻页。